**** AS OF WHM 11.36.0 (build 11) cPanel is no longer supporting custom PostgreSQL installation as previously ****
**** You will need to perform additional configurations not covered in this post for PostgreSQL to perform with cPanel. ****
**** cPanel has also added a new 'feature' that will over-write your pg_hba.conf file with their own settings. ****
**** Unless you wish to spend a lot of time adjusting to cPanel's changes, I would recommend just giving cPanel a miss and using a less intrusive control panel such as Webmin or Virtualmin ****
This post will cover installing PostgreSQL 9 on cPanel.
The OS is CentOS 5.5 and cPanel/WHM version is WHM 11.30.2 (build 1), but below should work for other releases as well.
We will start with the general installation and configuration and then see how to compile support for PHP, Perl, PDO, Python, and others.
Instructions are the same for PostgreSQL 9.0.x and 9.1.x. Just use the appropriate files names for the version you are installing.
It is important to note that cPanel supports ONLY the release that is available via the CentOS distribution (or Fedora or whatever supported distribution you are using).
By installing or upgrading to PostgreSQL 9.x, you will not be supported by cPanel.
The order of the steps below may seem idiosyncratic, but this order is what I have found to work.
As of PostgreSQL 9.x, the directory structures of PostgreSQL has changed.
In brief, installing PostgreSQL 9.x on cPanel simply requires creating the needed symlinks so that cPanel can find the files where it is looking for them (i.e. in the >=7.3 locations).
Step 1: Install the PostgreSQL Repo
You can download the PostgreSQL 9.0 repo here: http://yum.pgrpms.org/reporpms/repoview/pgdg-centos.html
If you want to install 9.1., simply download the PostgreSQL 9.1 repo. Again, the installation is identical for 9.0 and 9.1
Download the pgdg-centos-9.0-2.noarch (or pgdg-centos-9.1-3.noarch for 9.1) and upload to your server, or simply use wget.
root@s1 [~]# wget http://yum.pgrpms.org/reporpms/9.0/pgdg-centos-9.0-2.noarch.rpm
--2011-08-18 15:09:07--  http://yum.pgrpms.org/reporpms/9.0/pgdg-centos-9.0-2.noarch.rpm
Resolving yum.pgrpms.org... 77.79.103.58
Connecting to yum.pgrpms.org|77.79.103.58|:80... connected.
HTTP request sent, awaiting response... 200 OK
Length: 4623 (4.5K) [application/x-rpm]
Saving to: `pgdg-centos-9.0-2.noarch.rpm'

100%[======================================>] 4,623       --.-K/s   in 0.007s

2011-08-18 15:09:08 (682 KB/s) - `pgdg-centos-9.0-2.noarch.rpm' saved [4623/4623]
Install the repo.
root@s1 [~]# rpm -i pgdg-centos-9.0-2.noarch.rpm
We now need to update the CentOS-Base.repo file located at /etc/yum.repos.d
[root@sv2 ~]# cd /etc/yum.repos.d
[root@server1 yum.repos.d]# vi CentOS-Base.repo
add 'exclude=postgresql*' to the 'base' and 'updates' sections as shown below:
# CentOS-Base.repo
#
# The mirror system uses the connecting IP address of the client and the
# update status of each mirror to pick mirrors that are updated to and
# geographically close to the client.  You should use this for CentOS updates
# unless you are manually picking other mirrors.
#
# If the mirrorlist= does not work for you, as a fall back you can try the
# remarked out baseurl= line instead.
#
#

[base]
name=CentOS-$releasever - Base
mirrorlist=http://mirrorlist.centos.org/?release=$releasever&arch=$basearch&repo=os
#baseurl=http://mirror.centos.org/centos/$releasever/os/$basearch/
gpgcheck=1
gpgkey=file:///etc/pki/rpm-gpg/RPM-GPG-KEY-CentOS-5
exclude=postgresql*

#released updates
[updates]
name=CentOS-$releasever - Updates
mirrorlist=http://mirrorlist.centos.org/?release=$releasever&arch=$basearch&repo=updates
#baseurl=http://mirror.centos.org/centos/$releasever/updates/$basearch/
gpgcheck=1
gpgkey=file:///etc/pki/rpm-gpg/RPM-GPG-KEY-CentOS-5
exclude=postgresql*
Now, let's check everything is ready to install using yum list postgres*.
root@s1 [~]# yum list postgres* Loaded plugins: fastestmirror Loading mirror speeds from cached hostfile * addons: mirror.symnds.com * base: mirror.cs.vt.edu * extras: mirror.ash.fastserv.com * updates: ftp.usf.edu http://mirror.symnds.com/CentOS/5.6/addons/i386/repodata/repomd.xml: [Errno 4] IOError:Trying other mirror. addons | 951 B 00:00 base | 1.1 kB 00:00 extras | 2.1 kB 00:00 pgdg90 | 2.8 kB 00:00 pgdg90/primary_db | 54 kB 00:00 updates | 1.9 kB 00:00 Excluding Packages in global exclude list Finished Excluding Packages from CentOS-5 - Base Finished Excluding Packages from CentOS-5 - Updates Finished Installed Packages postgresql-libs.i386 8.1.22-1.el5_5.1 installed Available Packages postgresql-jdbc90.i386 9.0.801-1PGDG.rhel5 pgdg90 postgresql-jdbc90-debuginfo.i386 9.0.801-1PGDG.rhel5 pgdg90 postgresql90.i386 9.0.4-1PGDG.rhel5 pgdg90 postgresql90-contrib.i386 9.0.4-1PGDG.rhel5 pgdg90 postgresql90-debuginfo.i386 9.0.4-1PGDG.rhel5 pgdg90 postgresql90-devel.i386 9.0.4-1PGDG.rhel5 pgdg90 postgresql90-docs.i386 9.0.4-1PGDG.rhel5 pgdg90 postgresql90-jdbc.i386 9.0.801-1PGDG.rhel5 pgdg90 postgresql90-jdbc-debuginfo.i386 9.0.801-1PGDG.rhel5 pgdg90 postgresql90-libs.i386 9.0.4-1PGDG.rhel5 pgdg90 postgresql90-odbc.i386 09.00.0200-1PGDG.rhel5 pgdg90 postgresql90-odbc-debuginfo.i386 09.00.0200-1PGDG.rhel5 pgdg90 postgresql90-plperl.i386 9.0.4-1PGDG.rhel5 pgdg90 postgresql90-plpython.i386 9.0.4-1PGDG.rhel5 pgdg90 postgresql90-pltcl.i386 9.0.4-1PGDG.rhel5 pgdg90 postgresql90-python.i386 4.0-2PGDG.rhel5 pgdg90 postgresql90-python-debuginfo.i386 4.0-2PGDG.rhel5 pgdg90 postgresql90-server.i386 9.0.4-1PGDG.rhel5 pgdg90 postgresql90-tcl.i386 1.8.0-2.rhel5 pgdg90 postgresql90-tcl-debuginfo.i386 1.8.0-2.rhel5 pgdg90 postgresql90-test.i386 9.0.4-1PGDG.rhel5 pgdg90 postgresql_autodoc.noarch 1.40-1.rhel5 pgdg90 root@s1 [~]#
Ok, looks good. We can now install the PostgreSql software
Step 2: Install PostgreSQL 9 Using YUM:
root@s1 [~]# yum install postgresql90 postgresql90-devel postgresql90-server postgresql90-libs postgresql90-contrib
Step 3: Create the Required Symlinks for Data Directory:
The directory structure for PostgreSQL has changed with release 9.
So, we need to create some symlinks from the new location to the old locations (where cPanel is expecting to find the files).
root@s1 [~]# ln -s /var/lib/pgsql/9.0/data /var/lib/pgsql
root@s1 [~]# ln -s /var/lib/pgsql/9.0/backups /var/lib/pgsql
The above will create the required symlinks as shown below.
Step 4: Inialize PostgreSQL:
Now, initialize Postgres but do NOT start it.
root@s1 [~]# service postgresql-9.0 initdb
Initializing database:                                     [  OK  ]
root@s1 [~]#
Step 5: Configuring PostgreSQL using WHM:
My explanation of this part of the process is going to be a bit verbose. So, let's first give a quick summary of the steps we will take in this section.
1. In WHM, go to Main >> SQL Services >> Postgres Config. Click the "Install config" button under Postgres Config Install
2. In /var/lib/pgsql/9.0/data open pg_hba.conf file and change 'md5' to 'trust' (this is temporary, we will set it back to md5)
3. In WHM, go to: Main >> Restart Services >> SQL Server (PgSQL). Restart PostgreSQL
4. In WHM, go to Main >> SQL Services >> Postgres Config. Enter and confirm a password for the user postgres, and click the "Change Password" button
5. In WHM, Got to Main >> SQL Services >> Postgres Config. In the Create Postgres Users section, click the Create Users button.
6. In WHM, go to: Main >> Restart Services >> SQL Server (PgSQL). Restart PostgreSQL
If you like, you can simply follow steps 1 to 6 above and then move on to next section (Step 6: Check cPanel and PhpPgAdmin Functionality).
However, if you take a few extra minutes to go through the full explanations below (5a to 5e) it may help to avoid problems and provide a better understanding.
Now, for the long version:
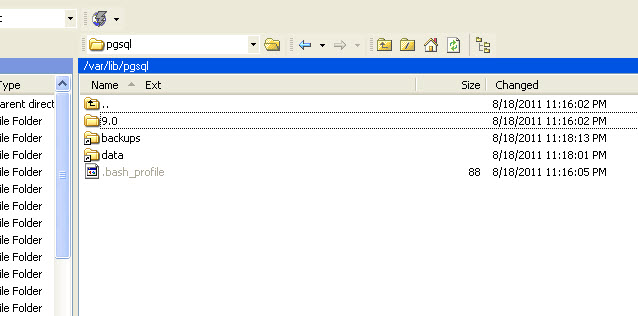
Since we initialized PostgreSQL step 4 above, you should now find that the /data directory at /var/lib/pgsql/9.0/data is now populated with the required files as shown below

Before proceeding, let's take a look at the default configuration in our pg_hba.conf file located in /var/lib/pgsql/9.0/data
It will look like this:
# Put your actual configuration here
# ----------------------------------
#
# If you want to allow non-local connections, you need to add more
# "host" records.  In that case you will also need to make PostgreSQL
# listen on a non-local interface via the listen_addresses
# configuration parameter, or via the -i or -h command line switches.


# TYPE  DATABASE        USER            CIDR-ADDRESS            METHOD

# "local" is for Unix domain socket connections only
local   all             all                                     ident
# IPv4 local connections:
host    all             all             127.0.0.1/32            ident
# IPv6 local connections:
host    all             all             ::1/128                 ident
To get PostgreSQL and cPanel communicating correctly and securely using md5, follow steps 5a to 5fbelow in the order shown.
5a. Set the Postgres Configuration File in WHM
1. In WHM, go to Main >> SQL Services >> Postgres Config
2. Click the "Install config" button under Postgres Config Install
5b. Edit the pg_hba.conf file
1. Go to the /var/lib/pgsql/9.0/data directory
2. Open the pg_hba.conf file in text editor or vi
The pg_hba.conf file will look like this:
# Put your actual configuration here
# ----------------------------------
#
# If you want to allow non-local connections, you need to add more
# "host" records.  In that case you will also need to make PostgreSQL
# listen on a non-local interface via the listen_addresses
# configuration parameter, or via the -i or -h command line switches.


# TYPE  DATABASE        USER            CIDR-ADDRESS            METHOD

# TYPE  DATABASE    USER        CIDR-ADDRESS          METHOD

# "local" is for Unix domain socket connections only
# IPv4 local connections:
# IPv6 local connections:

local all all        md5
host all all  127.0.0.1   255.255.255.255   md5
This now has md5 listed as our authentication method but at this point it will NOT work correctly.
In order to proceed, we need to TEMPORARILY change 'md5' to 'trust':
So, change this:
local all all        md5
host all all  127.0.0.1   255.255.255.255   md5
to this:
local all all        trust
host all all  127.0.0.1   255.255.255.255   trust
Save the pg_hba.conf file
5c. Restart PostgreSQL via WHM
1. In WHM, go to: Main >> Restart Services >> SQL Server (PgSQL)
2. Restart PgSQL.
When completed you will get a screen with something like this:
Waiting for postgresql to restart...............finished.

postmaster (/usr/pgsql-9.0/bin/postmaster -p 5432 -D /var/lib/pgsql/9.0/data) running as postgres with PID 14040

postgresql started ok
5d. Change the Postrges Password.
1. In WHM, go to Main >> SQL Services >> Postgres Config
2. In the Postgres Password section at bottom, enter and confirm a password for the user postgres, and click the "Change Password" button.
If you have done everything successfully, the output on the screen should be:
ALTER ROLE Password successfully changed
Now, note that if we go back to our pg_hba.conf file in /var/lib/pgsql/9.0/data, we will see that the authentication is no longer 'trust' but has now been returned to md5.
# Put your actual configuration here
# ----------------------------------
#
# If you want to allow non-local connections, you need to add more
# "host" records. In that case you will also need to make PostgreSQL listen
# on a non-local interface via the listen_addresses configuration parameter,
# or via the -i or -h command line switches.
#
# TYPE  DATABASE    USER        CIDR-ADDRESS          METHOD

# "local" is for Unix domain socket connections only
# IPv4 local connections:
# IPv6 local connections:

local all all        md5
host all all  127.0.0.1   255.255.255.255   md5
5e. Add Existing Users.
If you have existing users on the server, you can now add them
1. In WHM, Got to Main >> SQL Services >> Postgres Config
2. In the Create Postgres Users section, click the Create Users button.
5f. Restart the PostgreSQL server via WHM
Finally, In WHM, go to: Main >> Restart Services >> SQL Server (PgSQL). Restart PostgreSQL
Step 6: Check cPanel and PhpPgAdmin Functionality:
Now that we have completed the initial configuration, we should log into a cPanel account for a user and test functionality.
IMPORTANT: When testing functionality, do NOT open the users cPanel via WHM. If you do this, PhpPgAdmin will appear not to work. Rather, open a new browser and log into an cPanel normally as the end user.
1. Create a database using the cPanel GUI
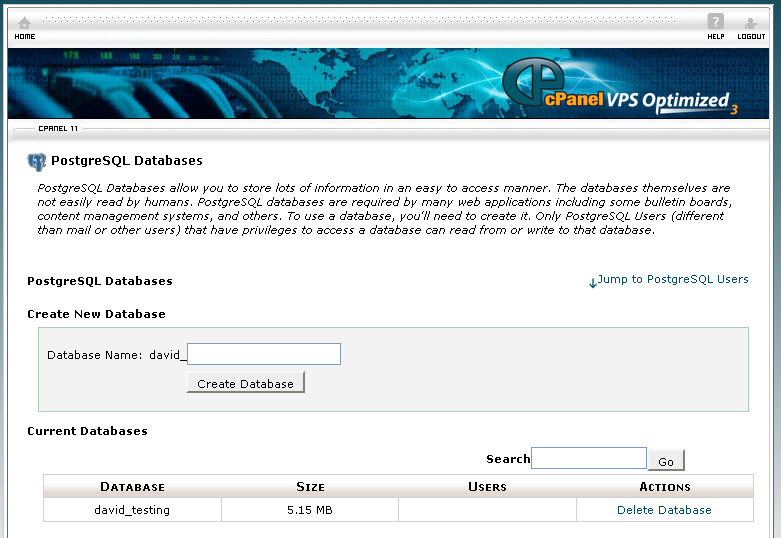
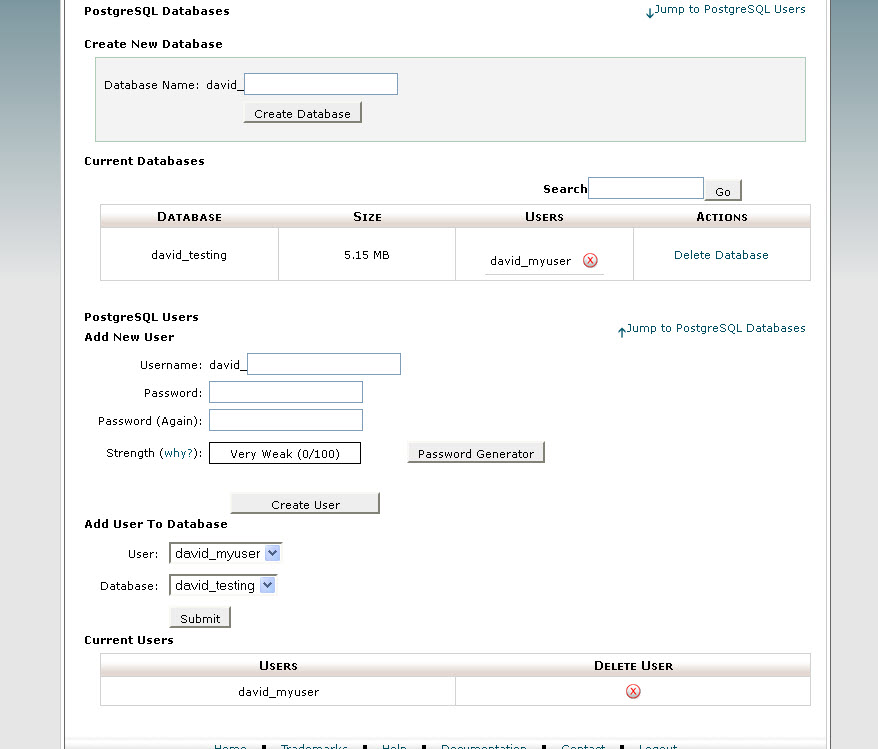
2. Add a user to the database you created using the cPanel GUI

3. Check PhpPgAdmin functionality.
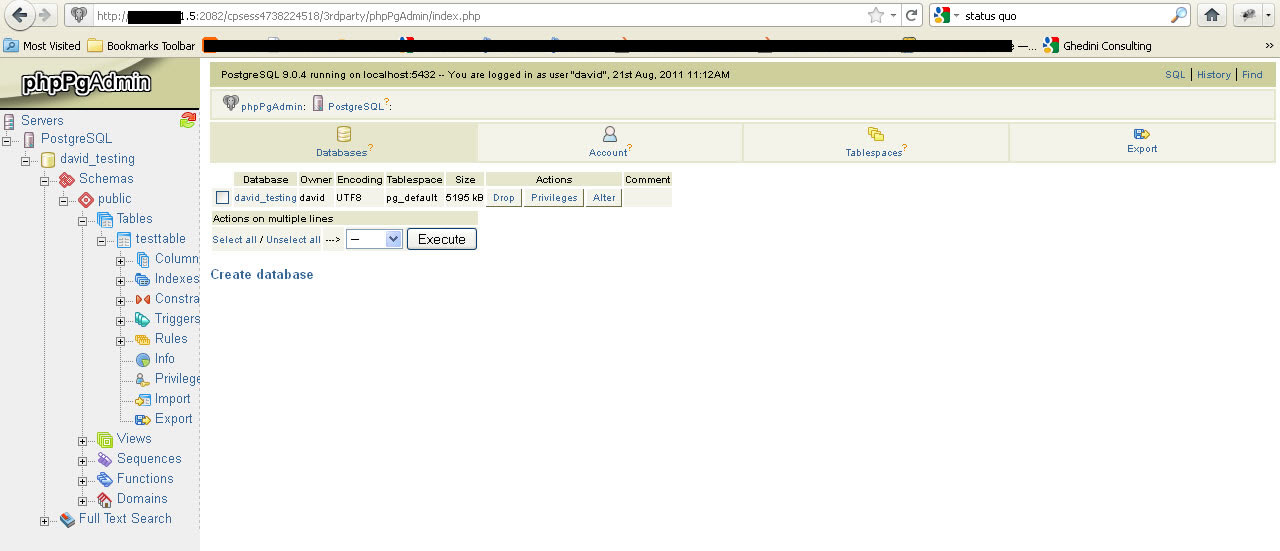
Use PhpPgAdmin to create a table and insert some data.
Finally, using cPanel and PhpPgAdmin, I have created the following:
Database: david_testing
User: david_myuser
Password: mypassword
Table: testtable
Table Columns: myid and myname
You can create whatever you like but I'll use the database, user, and table above in all subsequent examples for PHP, PDO, etc...
Since I will be using this database, table, and user to check my PHP other functionality below, before proceeding I'll just check what our data should look like using the command line (you can use PhpPgAdmin as well).
Open a shell as the end user:
login as: david
david@s1s password:
Last login: Sun Aug 21 14:10:38 2011 from ....
david@davespgtest.com [~]# psql david_testing
Password:
psql (9.0.4)
Type "help" for help.

david_testing=>
david_testing=> select * from testtable;
 myid |                       myname
------+----------------------------------------------------
    1 | David
    2 | Elouise
(2 rows)

david_testing=>
Step 7: Creating the pg_config Symlink:
When we first installed PostgreSQL 9 above, the installation automatically created a number of useful symlinks under /etc/alternatives as shown below.
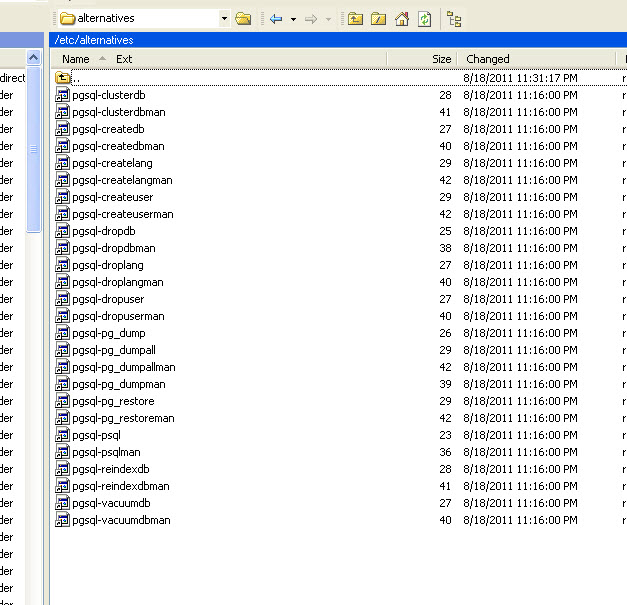
These are links into the CentOS /usr/bin directory from the new /usr/pgsql-9.0 directory where PostgreSQL /bin, /include, /share, /lib, and others are now installed as of PostgreSQL 9.
However, the file that we need to compile support for PHP, Perl, PDO, etc.. does not have a symlink created automatically.
The file we need for this is the pg_config file located under /usr/pgsql-9.0/bin.
PHP (EasyApache), Perl, PDO, Python, etc.. all use the pg_config file to locate required PostgreSQL files. More to the point, they expect to find the pg_config file under /usr/bin
So, in order to rectify this, we will create the required symlink:
root@s1 [~]# ln -s /usr/pgsql-9.0/bin/pg_config /usr/bin
Now, we are able to compile support for PHP, PDO, Perl, and the rest.
Step 8: Compile PHP Support:
You can now compile PHP support for PostgreSQL in WHM via EasyApache (Apache Update) as you normally would.
In WHM, go to Main >> Software and then to EasyApache (Apache Update)
Select the exhaustive list for the build and be sure to tick PGsql:

If you want to compile PDO support, you should enable PDO here as well. The specific PgSQL PDO support will be done below
Once EasyApahce completes, create a phpinfo() file in your domain and verify that PHP support now shows up.
Finally, create a test page, pgphp-test.php, like below:
Be sure to substitute the db, username, and password with your own.
\n"; $row = pg_fetch_array($result, $ri); echo ""; } pg_close($link); ?>PG PHP Test
| ID | Name |
|---|---|
| ", $row["myid"], " | ", $row["myname"], " |